4. Working with Document Services
In
this section, we go into greater detail about how to create, generate,
customize, publish, configure, and consume Dynamics AX document
services. Before getting into those details, we’re going to remind you
of the best way to create document services and look at an overview of
the life cycle of Dynamics AX document services.
Even
though you could create document services manually, we don’t recommend
that you do it. Creating them in either of the following ways is more
efficient and less prone to error:
Again, you can find this wizard and form at Tools\Development Tools\Application Integration Framework.
In this section, we assume that this AIF wizard and form manage both the document services and the document services artifacts.
Figure 3 shows the typical life cycle of a document service.

4.1 Creating Dynamics AX Queries
Document services are generated from queries.
(See the Database Queries section of the Microsoft Dynamics AX 2009 SDK
for details on creating Dynamics AX queries.) Although general
guidelines for working with Dynamics AX queries apply to document
services queries, some constraints and additional guidelines apply:
As a best practice, always name Dynamics AX queries that are used for document services with the prefix Axd and then the document name. For example, the document service query for the document SalesOrder should be AxdSalesOrder.
Only
one root table per query is allowed. You can associate the unique
entity key that is used to identify document instances with this root
table. For example, the entity key SalesId is defined on the AxdSalesOrder root table SalesTable.
When
your query’s data sources are joined by an inner join, you should use
fetch mode 1:1; when they are joined by an outer join, you should use
fetch mode 1:n. If you don’t use these
settings, your query and thus the service operations that use this query
could yield unexpected results.
If you
want to use a Dynamics AX document service to write data back to the
database—that is, if you need to support the service operation update—you need to set the AOT property Update to Yes for all data sources the query used to generate the service.
Note
For
security reasons, checks in X++ code by default prevent system tables
from being used in queries that are used for document services. |
Dynamics AX queries that are used to generate
Dynamics AX document services and thus comply with the preceding rules
are also referred to as Axd queries.
4.2 Generating Document Services
As mentioned earlier, you should always use the Create New Document Service Wizard to generate document services from existing Axd<Document>
queries. Find this wizard from the Dynamics AX drop-down menu. In this
section, we provide a high-level description of the Create New Document
Service Wizard and some important notes that govern its use.
In the wizard, you can select the service operations you want to generate: create, read, update, delete, find, and findKeys. If you select Generate AxBC classes when running the wizard, the wizard generates new Ax<Table> classes with parm methods for the fields of the underlying table when necessary. It then adds missing parm methods to existing Ax<Table> classes. The wizard never removes any parm methods from existing Ax<Table> classes—even if the corresponding table fields have been removed from the underlying table.
The Create New Document Service Wizard uses the
document name—which you enter on the first screen of the wizard—to
derive names for the generated artifacts. You can change the document
name (and thus the derived names for the artifacts) in the wizard before
the artifacts are generated. Names of AOT objects are limited to 40
characters. If you choose a document name that yields names that are too
long for one or more artifacts, you could get an error message.
Once
the wizard finishes, it displays a report of all generated artifacts
and any errors encountered. You need to fix any before you start
customizing the generated code with additional validation or defaulting
logic, which we talk about next.
Tip
The
wizard creates a new project for each generated service. It then adds
the generated artifacts automatically to the created project. |
For a more comprehensive discussion of the Create New Document Service Wizard and generating Axd<Document> and AX<Table> classes and related APIs, refer to the Microsoft Dynamics AX 2009 SDK.
4.3 Customizing Document Services
In many cases, you need to customize the
document services that have been generated from a query or that come
with Dynamics AX 2009 to better fit business needs. In this section, we
touch on some of the most common scenarios for customizing document
services, including customizing the application, service operations,
validation, defaulting, queries, and security.
Customizing Tables
When you customize a table (e.g., by adding a
column) that a document service uses, you need to update the service
implementation—that is, the Axd<Document> and Ax<Table>
classes and the data objects—to reflect these changes. You should
always enable best practice checks with the Best Practices tool to
detect potential discrepancies between the table structure and the
service implementation.
If the best practice checks on any of your customized tables fail, you can use the Update Document Service form to update the Axd<Document> class, Ax<Table> classes, and data objects to reflect the changes.
Caution
When
you modify the structure of tables or queries (e.g., by adding a column
to a table), you must also change your service contract—for example,
the XSD for the corresponding data objects. This change in turn
potentially breaks integrations that were built using the original
service contract. |
Adding Custom Service Operations
You can change the behavior of any service
operation simply by modifying its X++ implementation. In addition, you
can add custom service operations to any document service by following
the same steps used for adding service operations to custom services.
Customizing Validation Logic
You can customize the validation logic that is used when the service operations create, update, and delete
are executed. Validation logic is crucial to enforce data hygiene.
Ideally, invalid data must never be persisted in the Dynamics AX
database. You must add validation logic to any services—custom services
or document services—that you create or customize. Well-designed
validation logic has the following characteristics:
Reusable
Ideally, the same (generic) validation logic can be used from the
Dynamics AX client as well as from Dynamics AX services. Keep in mind
that nongeneric validation code, code that applies only to the Dynamics
AX client or Dynamics AX services, is also possible.
Well performing
Validation code runs whenever the respective Dynamics AX entity is
modified. As a consequence, one of your key goals for writing validation
logic must be adequate performance.
Sufficient
Validation logic must guarantee a sufficient level of data hygiene. You
might have to trade off sufficiency versus performance in a way that
satisfies your application’s requirements.
Validation code consists mainly of the following elements:
Code that orchestrates cross-table
validation by invoking validation code that is implemented on the
respective tables; this code is implemented in the respective Axd<Document> class methods prepareForSave, prepareForUpdate, and prepareForDelete. These prepareForXxx methods are called once for each Ax<Table> class that the Axd<Document> class uses.
Code that enforces table-level validation logic is implemented by the table methods validateField and validateWrite for maximum code reusability. These methods call into specific validation methods, such as checkCreditLimit on SalesTable.
Code that performs document-level validation, which is implemented by the Axd<Document> class method validateDocument. This method is called immediately before changes are persisted to tables, and after the prepareForXxx methods have been called for each Ax<Table> class.
Code that performs validation once data has been persisted to the table, which is implemented by the Axd<Document> class method updateNow.
The following code, the prepareForSave method for AxdSalesOrder, is an example of cross-table validation. It calls validation methods for the Ax<Table> classes AxSalesTable and AxSalesLine (as well as other Ax<Table> classes, which have been removed from this sample).
public boolean prepareForSave(AxdStack _axdStack, str _dataSourceName)
{

    // ...
    // code removed

    switch (classidget(_axdStack.top()))
    {
        case classnum(AxSalesTable) :
            axSalesTable = _axdStack.top();
            this.checkSalesTable(axSalesTable);
	    this.prepareSalesTable(axSalesTable);
            return true;

        case classnum(AxSalesLine) :
            axSalesLine = _axdStack.top();
            this.checkSalesLine(axSalesLine);
	    this.prepareSalesLine(axSalesLine);
            return true;

        // ...
        // code removed
}
|
Customizing Defaulting Logic
You can customize the defaulting logic for
table fields that is executed as part of creating or updating table
rows. Defaulting logic helps increase the usability of both interactive
Dynamics AX client applications and Dynamics AX service interfaces. It
derives initial values for table fields from other data—such as values
of other table fields—and thus doesn’t require explicit value
assignments for the defaulted table fields. It also helps reduce the
amount of data required to manipulate more-complex entities, such as
sales orders, while lowering the probability of erroneous data entry.
Well-designed defaulting logic has the following characteristics:
Reusable
You should implement defaulting logic so that it is reusable—that is,
so the same logic can be used regardless of which Dynamics AX client
(e.g., a user interface or a service client) creates or updates the
entity. In certain scenarios, the defaulting of table fields might
require different logic, depending on whether the Dynamics AX client is
interactive (e.g., a user interface) or noninteractive (e.g., a request
from a service client).
Well performing
Because the defaulting logic for a table field is invoked every time
the field is set, its execution time directly impacts the processing
time for manipulating the
entity (e.g., a sales order). In particular, you should try to avoid
redundant defaulting steps—that is, setting a field value that is
overwritten again as part of the same defaulting logic.
Sufficient
To reduce the number of required fields for manipulating entities, as
many fields as possible should be defaulted—while still meeting the
performance goals.
The defaulting logic consists mainly of the following elements:
Defaulting rules Ax<Table>
classes provide methods for setting fields, which the framework uses
for assigning values to table fields. This method, set<Fieldname>, implements the defaulting logic for the table field Fieldname of the table that is associated with the Ax<Table> class.
State tracking of the defaulting state of table fields
The method isMethodExecuted, which is implemented by Ax<Table> classes, is used to check whether the respective set<Fieldname>
method has already been invoked (see the following code). This check is
necessary to detect and avoid loops in the defaulting logic.
The method isFieldSet, which is implemented by Ax<Table> classes, checks whether a table field has been set.
The following code shows the set<Fieldname> method for the table field DeliveryCounty, that is, setDeliveryCounty, as implemented by the Ax<Table> class AxSalesTable. You should add defaulting logic similar to that shown in this example to new set<Field> methods of newly generated or updated Ax<Table> classes, if applicable.
protected void setDeliveryCounty()
{
    if (this.isMethodExecuted(funcname(), fieldnum(SalesTable, DeliveryCounty)))
    {
        return;
    }

    this.setZipCodeRecordFields();

    if (this.isZipCodeRecordFieldsSet())
    {
        this.parmDeliveryCounty(this.zipCodeRecord().County);
        return;
    }

    this.setCustAccount();

    if (this.isFieldSet(fieldnum(SalesTable, CustAccount)))
    {
        if (this.axAddress().addressTable())
        {
            this.parmDeliveryCounty(this.axAddress().parmCounty());
        }
        else
        {
            this.parmDeliveryCounty(this.custAccount_CustTableRecord().County);
        }
    }
}
|
Customizing Axd<Document> Queries
You can customize the Axd<Document>
queries that come with Dynamics AX to generate document services for
new or existing AOT elements. For example, assume that you’ve created a
new table containing several illustrations per inventory item. Now you
want to include those illustrations with purchase orders and to update
the document service associated with the purchase orders. To do that,
you would modify the query AxdPurchaseRequisition to include the new table and then use the Update Document Service form to update the document service associated with AxdPurchaseRequisition.
Your process would look like this:
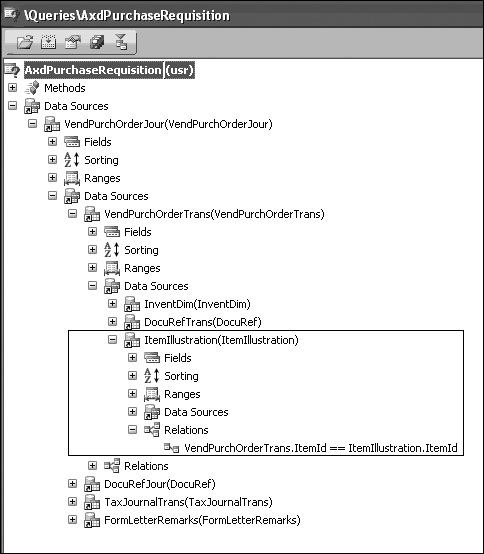
Modify the query AxdPurchaseRequisition to include the new ItemIllustration table. Figure 4
shows what the query looks like after the new table has been added. The
boxed area must be added to the original query that came with Dynamics
AX 2009.
Open the Update Document Service form and enter AxdPurchaseRequisition for the query name. The remaining fields are indifferent to the processing because no modifications are made to existing Axd<Document>
classes. If you carefully created the relationships in the query, the
form can construct all required code in the prepareForSave method.
You need to generate new Ax<Table> classes, but you shouldn’t need to update existing Ax<Table> classes.
After you close the Update Document Service
form, you must fix potential compilation errors and all the to-do
comments that the Create New Document Wizard produces in the generated
code. First, you remove the caching if it isn’t needed. You do this by
removing the methods CacheObject and CacheRecordRecord. When removing these classes, you must also remove the two static variables from the class declarations cacheRecordIdx and cacheObjectIdx. Assume that InventDim isn’t influencing the illustration; then you simply remove the optional parameter so that the parmItemId method looks like the code shown here.
public str parmItemId(str _itemId = '')
{
    DictField dictField;
    ;
    if (!prmisdefault(_itemId))
    {
        dictField = new DictField(tablenum(ItemIllustration),fieldnum(ItemIllustration,ItemId));
        this.validateInboundItemIdString(_itemId,dictField);
        if(this.valueMappingInbound())
        {
            item = _itemId;
        }

        this.setField(fieldNum(ItemIllustration, ItemId), _itemId);
    }

    if (this.valueMappingOutbound())
    {
        return conpeek(this.axSalesItemId('', itemIllustration.ItemId),1);
    }
    else
    {
        return itemIllustration.ItemId;
    }
}
|
To use the updated service, you have to open and refresh the Services form. If you published PurchaseRequisitionService as a Web service, you also need to regenerate the Web service on the Services form.
Customizing Security
By default, record-level and column-level
security are applied to all data retrieval. In certain scenarios,
however, you need to ignore record-level and column-level security—for
example, when invoices need to be sent. In those scenarios, the user
must be able to see the same data that is posted, regardless of the
security settings. The following code sample shows how to override the
default behavior.
protected void unpackPropertyBag(AifPropertyBag _aifPropertyBag)
{
    AxdSendContext axdSendContext = AxdSendContext::create(_aifPropertyBag);
    ;
    // Get send context properties.
    ...
    this.security(axdSendContext.parmSecurity());
    ...
}
|
Caution
Be very diligent when customizing security mechanisms, and make sure you understand the implications of your modifications. |